When you're setting up the payroll module for the first time, here are the things you need to take note of.

Note: You can click on the links throughout this article to find out more about particular topics.
Step 1: Check Key Information
In order for payroll to work properly, the following information is required. Please ensure that all details have been filled out correctly.
For the company
Under Company > Company Settings:
Registered Address
Logo
Country
Currency
Sector
Tax ID Number
Tax Branch Code
Tax Calculation Method
Social Security Fund Setting
Provident Fund Setting
For each employee
Under My Employees > Personal > Profile & Personal Contact Details
Date of birth
Marital status
Blood Group
Under My Employees > Personal > Residency
National ID *Note that Nationality needs to be set by Admin under Career Progression in order for this field to work
Country of birth
- Residency Status
Under My Employees > Payroll > Bank details
Bank details
Under My Employees > Payroll > Salary Contribution
- Tax ID
- Tax Condition
- SSF Contribution
- PVF Contribution
Under My Employees > Employment > Employment Details
Employee ID
Country of work
Currency
Under My Employees > Career Progression
Nationality / Citizenship
Rate of pay
Basic pay
Joining date
Step 2: Add Pay Types
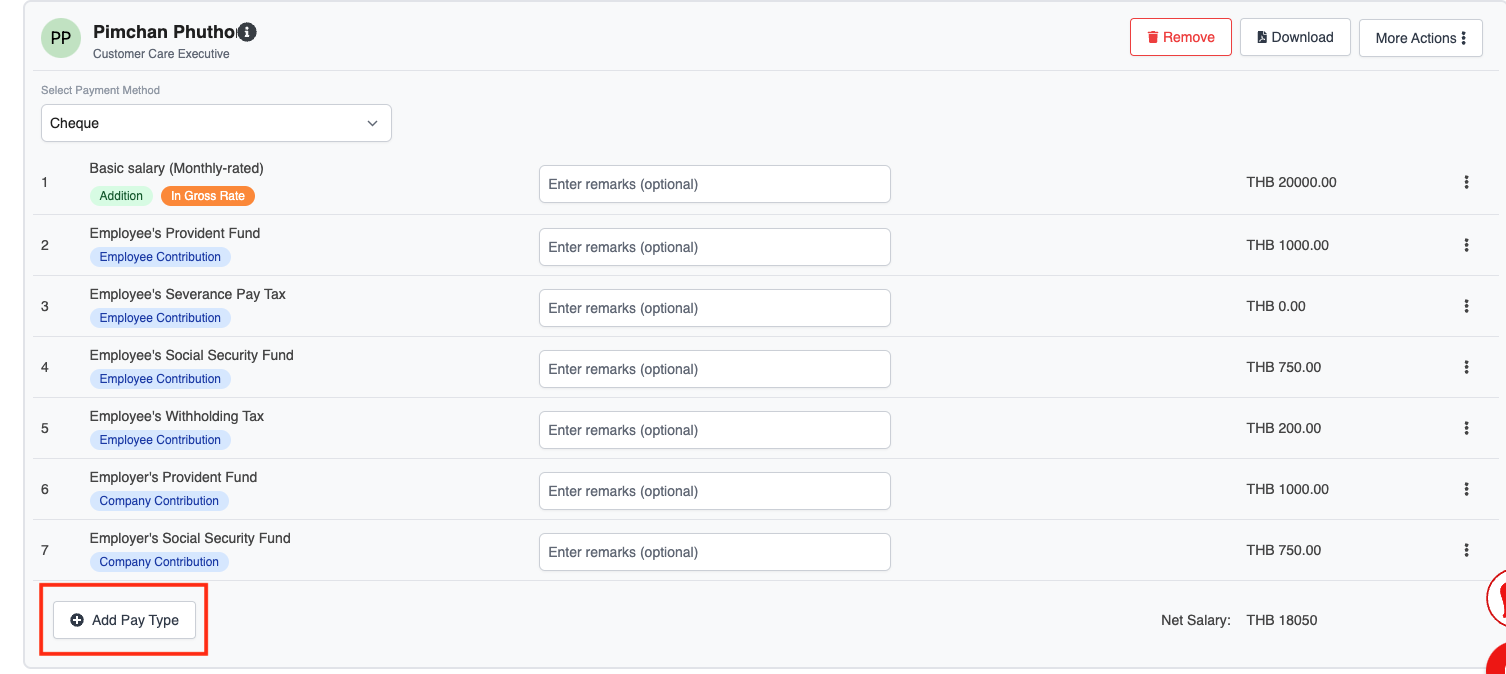
The default pay types such as basic salary, salary contributions, etc. will already be in the system, so you don't need to set these up.
All withholding tax, Social Security Fund, and Provident Fund contributions will be automatically calculated and added to each employee's payroll.
The basic salary will also be automatically calculated, taking into account any leave that the employee has taken.

If you have any other pay types that are applicable, you can add them in two ways:
From the Pay Types Gallery
By creating a New Pay Type
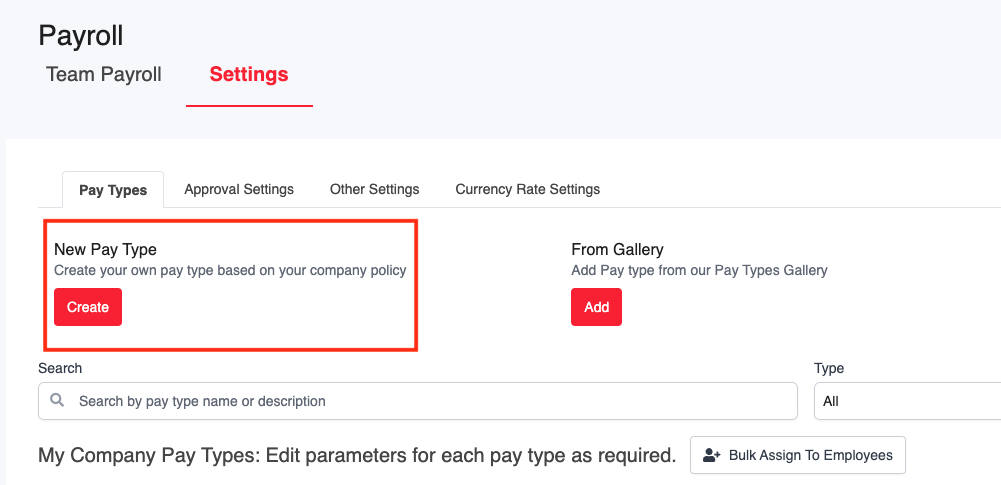
Adding pay types from the Pay Types Gallery
When adding Pay Types, you can first look at our Pay Types Gallery to see if it already exists.
Go to Payroll > Settings > Pay Types > From Gallery.

You can search for a pay type using the search bar, or filter by type.

To add a pay type, click on the "+" button next to the pay item you'd like to add. You will be taken to the "Pay Type" screen.

Click "Clone".

Creating New Pay Type
If you don't see what you want in the Pay Types Gallery, you can click on New Pay Type to create one from scratch.
For each Pay Type, be sure to fill out the following information:

Fill in the name and a short description for the pay type
Select whether it is an Addition (to add to pay) or Deduction (to deduct from pay). For example, commission is an Addition, while unpaid leave is a Deduction.
3. Select the Category List.
Select whether it is Tax Applicable
Select whether it is a recurring pay item.
Select whether it is SSF Applicable
Select whether it is PVF Applicable
Select whether it is included in the OT computation.
Editing Pay Type
If at any time you wish to edit or delete a custom pay type, you can click on the pencil icon to edit, or the bin icon to delete.

System pay types cannot be edited or deleted. They will not have the pencil or bin icon showing.
Adding Pay Type to Payroll
Once the Pay Type is set up, you will be able to add it to a particular employee's payslip by clicking on the Add Pay Type dropdown menu in each payroll.
Step 3: Configure Payroll Settings
Go to Payroll > Settings > Other Settings
Set up the company's day in a month type, working hours in a day, payday and payment frequency.

By selecting the "Salary Paid Twice a Month" option, you will be able to configure the following necessary details.

Step 4: Create and Run Payroll
Was this article helpful?
That’s Great!
Thank you for your feedback
Sorry! We couldn't be helpful
Thank you for your feedback
Feedback sent
We appreciate your effort and will try to fix the article